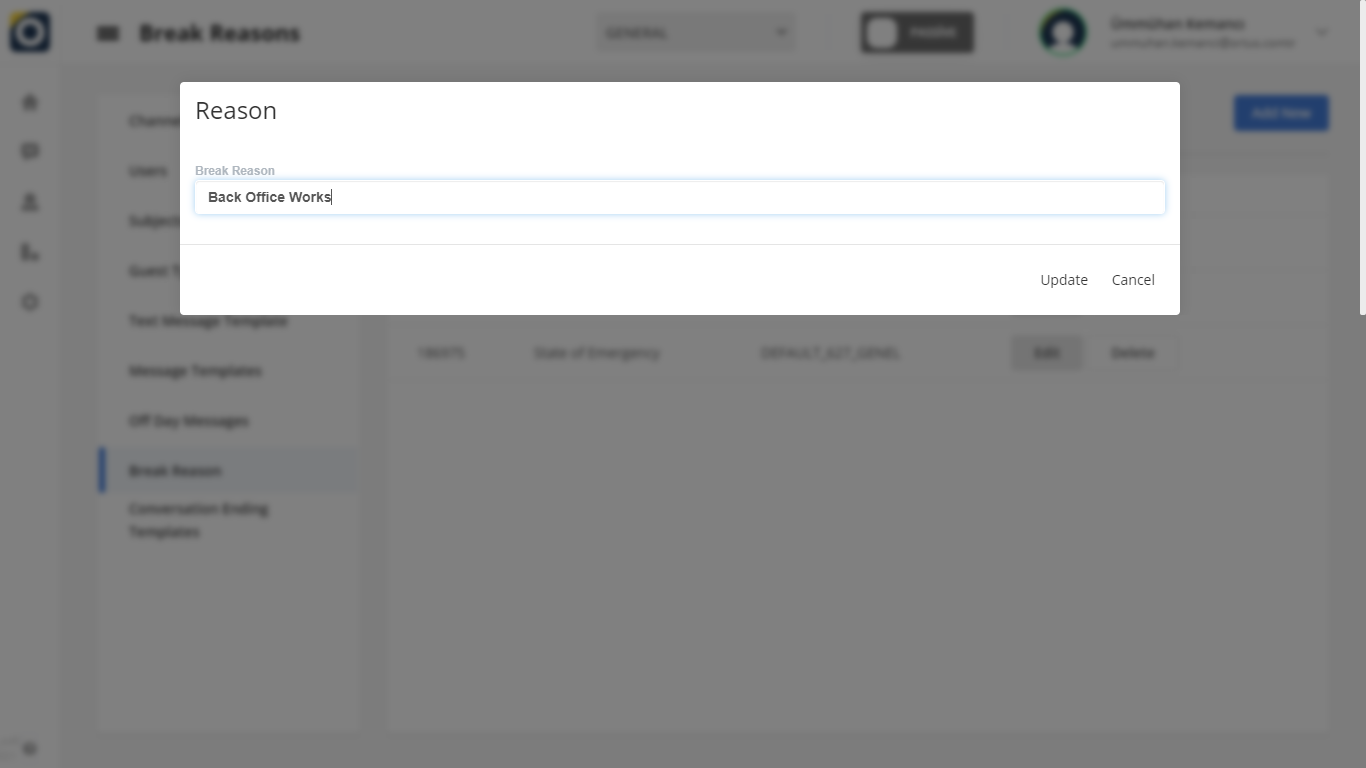
Author: Oguzhan Ozben

Anasayfa

“El Kitabı” bölümündeki Ana Sayfa müşteri hizmetleri temsilcilerinin ana sayfasıdır. Ana sayfadan, Ekip bölümünde sizin için çevrimiçi olan operatör sayısını görebilir ve istatistiklerinizi inceleyebilirsiniz. Ayrıca mevcut işlerinizi, havuz garsonlarınızı ve çevrimdışı mesajlarınızı da görüntüleyebilirsiniz. Daha fazla bilgi için aşağıdaki yazıyı okuyabilirsiniz. ??
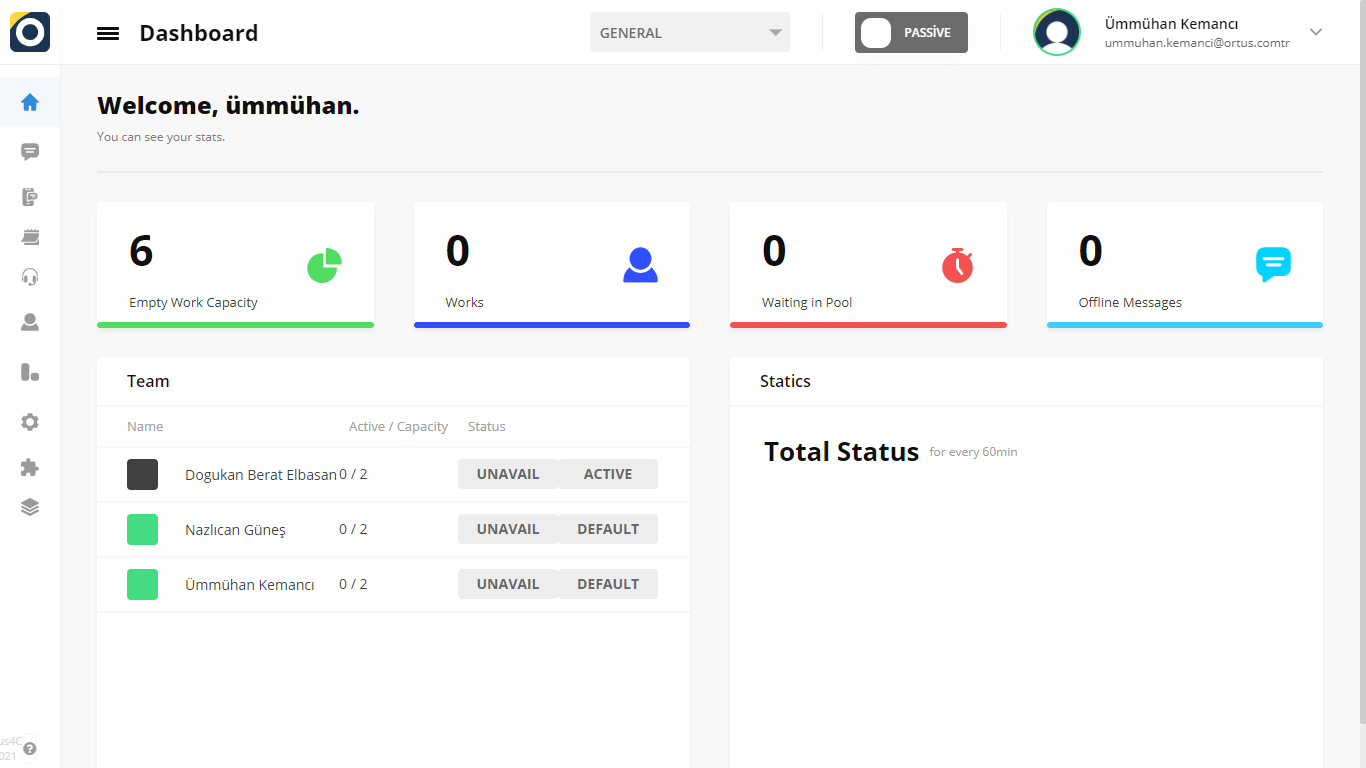
Boş Kapasite

Boş Kapasite çalışmaları bölümü, bir operatörün alabileceği müşteri kapasitesini gösterir. Bunu bir örnek vererek daha anlaşılır hale getirelim. Örneğin bir operatörün kapasitesi 5 müşteri alacaksa, 5 müşteri geldiğinde onlara karşılık gelecektir. Eğer 6. bir müşteri varsa o müşteri sıraya girecektir. Yönetici ayarlardan düzenleyerek operatörlerin kapasitesini artırabilir veya azaltabilir. Operatör aynı şeyi yapamaz.

Yöneticilerin bu bölümü nasıl düzenleyebileceği aşağıda açıklanmıştır: Ayarlar > Özelleştirme > Kullanıcı

İşler

İşler bölümünde, sisteminize kaç iş atandığını ve mevcut iş sayısını görüntüleyebilirsiniz.

Havuzda Beklemek

Müşterileriniz mesaj bölümünde görünecek ve sisteminizde görülebilecektir. Havuzda bekleyenler bölümünü kullanarak sırada bekleyen müşteri sayısını görebilirsiniz. Çevrimdışı mesajlar bölümünde müşterileriniz mesai saatleri dışında görüşmelerine rağmen çevrimdışı form dolduracaklardır. Burada doldurdukları cevaplar ve bıraktıkları mesajlar da Çevrimdışı Mesajlar bölümünde görünecektir.

Takım

Ekip Bölümünde havuzda bekleyen ve hizmet almak isteyen müşterilerinizle ilgilenecek operatörler ekip bölümünde listelenecektir. Ekibinizdeki tüm operatörlerinizi burada görebileceksiniz. Müsait olup olmadıkları sistemde belirlenir ve buna göre müşterilere bir operatör atanır. Ayrıca hangi operatörün müsait olduğunu görüntüleyerek görme ve inceleme imkanına sahipsiniz.

İstatistikler

İstatistik bölümü, durumunuzu gözlemlemek ve incelemek için çok kolay bir işlevdir. Burada durumunuz her 60 dakikada bir güncellenir, böylece işinizle ilgili güncel bilgileri takip edebilirsiniz.

Yukarıdaki metin ve yazılarda da görebileceğiniz gibi ana sayfa, operatörün giriş yaptıktan sonra karşısına çıkan ve günlük iş akışının bulunduğu sayfadır. Burada gün içinde gerçekleşen işlerin yanı sıra diğer seçenekleri kullanarak özelleştirdiğiniz değişiklikler de yer alır. Ayrıca burada yaptığınız çalışmalar otomatik olarak raporlar Bölüm.

Bu kadar!

Hala yardıma ihtiyacınız var mı? Bize Mesaj Gönderin

Homepage

“Homepage “ in the  “Handbook” section is the homepage of customer service representatives. From the homepage, you can see the number of operators available online for you in the Team section and review your statistics. You can also view your existing jobs, pool waiters, and offline messages. You can read the article below for more information. ??

The Empty Capacity

The Empty Capacity works section shows the customer capacity that an operator can receive. Let’s make this more understandable by giving an example. For example, if an operator’s capacity is to take 5 customers, 5 customers will correspond with them when they arrive. If there is the 6th one the customer will be queue. Admin can increase or decrease the capacity of operators by editing them in the settings. The operator cannot do the same.

Here’s how admins can edit this section: Settings > Customization > User

Works

In the works section, you can view how many jobs have been assigned to your system and the number of jobs available.

Waiting in Pool

Your customers will appear in the message section and will be able to seen in your system. You can use the waiting in pool section so you can see the number of customers waiting in line. In the offline messages section, your customers will fill out offline forms despite out-of-hours conversations. The answers they have filled in here and the messages they have left will also appear in the Offline Messages section.

Team

In the Team Section, operators who are waiting in the pool and will take care of your customers who want to receive services will be listed in the team section. You will able to see every your operator on your team in here. It is determined in the system whether they are available or not, and according to this the customers are assigned an operator. In addition, you have the opportunity to see and review by viewing which operator is available.

Statistics

The statistics section is a very easy function to observe and examine your situation. Here your status is updated for every 60 minutes, so you can keep up to date with your work.

As you can see in the above text and articles, the homepage is the page that faces the operator after logging in and where the daily workflow is located. here are the jobs that take place during the day, as well as changes that you customization using other options. in addition, the work you do here will be automatically registered in the reports section.

That’s it!

Still need help? Message Us

Konular

Konular

“Yapılandırma bölümündeki Konular” müşteri tarafından kullanılan şablonlardır. Müşteriler, müşteri hizmetleri temsilcisine bağlanırken sorun yaşadıkları konuyu seçecekler, böylece operatör görüşmenin başında müşterinin ne ile ilgili sorun yaşadığını görebilecek. Bu sayede istedikleri destek ve hizmete daha hızlı erişebilecekler. Burada konu yönetimi oluşturabilir, düzenleyebilir ve silebilirsiniz. Daha fazla bilgi için aşağıdaki makaleyi okuyabilirsiniz. ??

Size örnek olması için buraya birkaç konu başlığı ekledik. Burada konuları siz belirleyebilirsiniz. Her ne kadar size yol göstermesi için örnekler vermiş olsak da bu konuların tek bir türü yoktur. Şirketlerin amacına ve hizmetine göre bu konular belirlenebilir. Siz kendi firmanızın hizmetlerine göre buraya yeni konular ekleyebilir, değişiklikler yaparak düzenlemeler yapabilirsiniz.

Kendi müşterilerimizden birkaç örnek daha verebiliriz. Örneğin sivil toplum kuruluşu olan bir müşterimizin destek hattında kendilerine göre farklı bilgiler var. Bu başlıklar bağış, bilgilendirme, öneri, randevu, yardım talebi ya da teşekkür gibi pek çok bilgiyi içeriyor.

Öte yandan Türkiye’de Netflix gibi dijital içerik üretim platformu olan bir şirket müşterimiz için üyelik iptali, kampanyalar, fatura bilgileri gibi konular ve daha fazlası. İşin püf noktası, müşterilerinizin destek için neler talep edebileceğini ve şirketinizin hizmetlerini ve hedeflerini göz önünde bulundurmaktır. Bu gözlemi yaptıktan sonra şirketinizin ve müşterilerinizin ihtiyaçları ile ilgili konuları belirlemeniz daha kolay olacaktır.

Ayrıca sizlere örnek teşkil etmesi için yüklediğim konuların duruşunu OrtusDesk üzerinden göstermek istedim. Kategorilerinizi belirlediğinizde müşterilerinizin karşısına bu şekilde bir sayfa çıkacaktır. Böylece istedikleri destek ve hizmete daha hızlı ulaşacaklardır.

Konuya Yeni Ekle

Eğer tıklarsanız ”Yeni Ekle” düğmesine bastığınızda bu ekranı göreceksiniz. Eğer girerseniz  konu açiklamasi yeni̇ ekle bölümündeki̇ bi̇lgi̇ler i̇le şablonlariniz hazir olacaktir.

Burada belirleyeceğiniz konu başlıkları müşterilerinizin ekranında da görülecektir. Bu sayede müşterilerinizin daha iyi hizmet alabilmesi için kategoriler belirleyebilirsiniz. “Yeni ekle” butonundan yeni konular ekleyebilirsiniz.

Bu butona tıkladıktan sonra karşınıza yukarıdaki ekran gelecektir. Buraya konu açıklamasını girdikten sonra bir konu oluşturmuş olacaksınız. Yine konuların yanında bulunan düzenle ve sil bölümlerinden dilediğiniz gibi değişiklik yapabilirsiniz.

Konuyu Düzenle

Kullanabilirsiniz Konuyu düzenlemek için metin sütunundaki “Düzenle” seçeneğini kullanın. Düzenlediğiniz metin istediğiniz yönde değişecektir. Düzenleme tamamlandığında, Ana ekranın sağ üst köşesinde güncelleme başarılı ifadesini göreceksiniz. Hazır!

Konuya Sil

Kullanabilirsiniz Konunuzu silmek için mesaj sütunundaki “Sil” seçeneğini kullanın. Silme işlemi tamamlandığında, Ana ekranın sağ üst köşesinde Silme işlemi başarılı ifadesini göreceksiniz. Hazır

Bu kadar!

Hala yardıma ihtiyacınız var mı? Bize Mesaj Gönderin

Subjects

Subjects

“Subjects” in the “Configuration” section are templates used by customer. Customers will select the issue they are having problems with when connecting to the customer service representative, so the operator will be able to see what the customer is having problems with at the beginning of the conversation. In this way, they will have faster access to the support and service they want. Here you can create, edit, and delete subject management. You can read the article below for more information. ??

We have included a few topics here to serve as an example for you. Here you can specify topics. Although we have given examples to guide you, there isn’t a single type of these subjects. These topics according to the purpose and service of the companies. You can add new topics here according to the services of your own company, make edits by making changes.

We can give a few more examples from our own customers. For example, the support line of a customer organization which is a non-governmental organization, has different information according to them. These topics contain a lot of information such as donations, information, suggestions, appointments, help requests or thanks.

On the other hand, for our customer of a company that has a digital content production platform like Netflix in Turkey, the subjects such as membership cancellation, campaigns, billing information and more. The trick is to consider what your customers may request for support and your company’s services and goals. After making this observation, it will be easier for you to determine the subjects related to the needs of your company and customers.

Also, I wanted to show you the stance of the subjects I uploaded to set an example for you through OrtusDesk. When you specify your categories, a page like this will appear in front of your customers. Thus, they will access the support and service they want faster.

Add New to Subject

If you click the ”Add New” button, you will see this screen. If you enter subject description information in the add new section, your templates will be ready.

The topics you will set here will also seen on your customers’s screen. This allows you to identify categories so that your customers get better service. You can add new subjects from the button which is ”add new”.

After clicking this button, there will be a screen above. After entering the subject description here, you will create a subject. Again, you can make the changes as you wish from the edit and delete sections next to the topics.

Edit To Subject

You can use the “Edit” option in the text column to edit the subject. The text you edit will change in the desired direction. When editing is complete, you will see the update successful statement in the upper-right corner of the Home screen. It’ s Ready!

Delete to Subject

You can use the “Delete” option in the message column to delete your subject. When the deletion is complete, you will see the Delete successful statement in the upper-right corner of the Home screen. It’ s Ready

That’s it!

Still need help? Message Us

Mola Nedeni

Mola Nedeni

“Konfigürasyon bölümünde yer alan “Ara Verme Nedeni” müşteri hizmetleri temsilcileri tarafından kullanılan şablonlardır. Bu şablonlar, müşteri hizmetleri temsilcilerinin aktiften pasife geçerken kullandıkları nedeni bildiren şablonlardır. Burada yeni bir mola nedeni oluşturabilir, düzenleyebilir ve silebilirsiniz. Daha fazlası için aşağıdaki makaleyi okuyabilirsiniz BİLGİ??

Burada belirttiğiniz nedenler sistemdeki operatörlerin aktif durumdan pasif duruma geçişini belirtmek için kullanılacaktır. Aktif olmayan bir operatör hiçbir mesaja cevap veremez. Bu durumda müşteri tarafından operatöre yazılan mesajlar, operatörün  “Mesajlar” > “Bilet” bölümü. Operatör pasiften aktife geçtiğinde, mesajlara aşağıdaki bölümden erişilebilir  “Mesajlar” > “Bilet” bölümü. Bu şablonları hazırlamak tamamen sizin elinizdedir. Kişiselleştirilmiş molanızın nedenleri diğer operatörleriniz tarafından görüntülenecek ve aktiften pasife geçerken her operatör için kullanılabilir olacaktır.

Kırılma Nedenlerine Yeni Ekle

Eğer tıklarsanız ”Yeni Ekle” butonuna bastığınızda karşınıza bu ekran gelecektir. Yeni ekle kısmına mola nedeni bilgilerini girdiğiniz takdirde şablonlarınız hazır olacaktır.

Mola Nedeni

Mola nedeni, aktiften pasife geçerken nedeninizi belirteceğiniz alandır.

Yeni bir mola nedeni eklediğiniz için ana ekranda değişiklikleri kaydetmeniz için bir uyarı alacaksınız. Değişiklikleri kaydetmek için “reoland” tuşuna basarak sisteme yükleyebilirsiniz. Yeni bir mola nedeni ekleme işlemi tamamlandığında  “süreç başladı” ana ekranın sağ üst köşesinde. Hazır!

Nedenleri Kırmak için Düzenle

Ara verme nedenini düzenlemek için Ara verme nedenlerinin yazılı olduğu sütunda “Düzenle” seçeneğini seçiniz. Ara verme nedeniniz istediğiniz yönde değişecektir. Düzenleme tamamlandığında Ana ekranın sağ üst köşesinde güncelleme başarılı ifadesini göreceksiniz. Hazır!

Nedenleri Kırmak için Sil

Ara verme nedenlerinizi silmek için ara verme nedeni sütunundaki Sil seçeneğini kullanabilirsiniz. Silme işlemi tamamlandığında, Ana ekranın sağ üst köşesinde Silme işlemi başarılı ifadesini göreceksiniz. Hazır

Bu kadar!

Hala yardıma ihtiyacınız var mı? Bize Mesaj Gönderin

Break Reason

Break Reason

“Break Reason” in the “Configuration” section are templates used by customer service representatives. These templates are templates that inform the reason that customer service representatives use when moving from active to passive. Here you can create, edit and delete a new break reason. You can read the article below for more information??

The reasons you stated here will be used to indicate the transition of the operators in the system from the active to the passive state. An inactive operator cannot reply to any messages. In this case, the messages written by the customer to the operator will fall into the “Messages” > “Ticket” section. When the operator switches from passive to active, the messages can be accessed from the “Messages” > “Ticket” section. Preparing these templates is entirely in your hands. The reasons for your personalized break will be displayed by your other operators and will be available for each operator when moving from active to passive.

Add New to Break Reasons

If you click the ”Add New” button, you will see this screen. If you enter break reason information in the add new section, your templates will be ready.

Break Reason

The break reason is the area where you will specify your cause when moving from active to passive.

You will receive a warning to save changes on the home screen because you have added a new break reason. You can install it into the system by pressing the “reoland” key to save the changes. when the process of adding a new break reason is complete, you will see the “process started” in the upper-right corner of the main screen. It’s Ready!

Edit to Break Reasons

You can to edit the reason for the break, you can use the “Edit” option in the column where the reasons for the break are written. The reason for your break will change in the direction you want. When editing is complete, you will see the update successful statement in the upper-right corner of the Home screen. It’s Ready!

Delete to Break Reasons

You can to delete your break reasons, you can use the Delete option in the break reason column. When the deletion is complete, you will see the Delete successful statement in the upper-right corner of the Home screen. Ready

That’s it!

Still need help? Message Us

Grup Tipi

Grup Tipi

“Grup Türü” adresinde “Konfigürasyon” bölümü müşteriler tarafından kullanılan şablonlardır. Müşteri hizmetleri temsilcileri burada müşterilerin kaç farklı katagoriye katılacağını belirler ve müşteri görüşmeye başlamadan önce bulunduğu katagoriyi seçerek müşteri hizmetleri temsilcisine bağlanır. Burada şunları yapabilirsiniz  oluşturun, düzenleyin, ve  müşteri tipi yönetimini silinDaha fazla bilgi için aşağıdaki makaleyi okuyabilirsiniz?

Müşterilerinizi burada kategorize ederek, bir önceki yazımızda bahsettiğimiz konular gibi müşterilerinizi organize edebilirsiniz. Benzer bir konu olan yazımıza şuradan ulaşabilirsiniz  Konfigürasyonlar >  Konu bölüm.  

Yine şirketinizin müşteri tipine ve müşteri Pazarına göre değişiklikler olabilir. Daha anlaşılır olması için aşağıda gördüğünüz ekranda sizlere örnekler verdim. Bu sefer kendi firmamızdan örneklerimizi vermek istedim. Örneğin bu destek hattı üzerinden bize ulaşan müşterilerimizi bu şekilde organize edebiliyoruz. Müşterilerimiz önce bizi işaret ediyor, yani ne zaman şirket adına bizimle iletişime geçmek istiyorlar. Ayrıca bu bölüm ile müşterileriniz için kategoriler oluşturarak düzenlemeler yapabilir ve daha düzenli olabilirsiniz. Ama önce size başka bir şey göstermek istiyorum.

Burada yaptığınız değişiklikler veya eklemeler destek hattında aynen bu şekilde görünecektir. Bu ekran müşterilerinizi karşılıyor. Buradan dilediğiniz gibi değişiklikler ya da eklemeler yaparak bu destek hattını firmanıza göre özelleştirebilirsiniz.

Grup Türüne Yeni Ekle

Eğer tıklarsanız ”Yeni Ekle” düğmesine bastığınızda bu ekranı göreceksiniz. Eğer girerseniz  konu açiklamasi yeni̇ ekle bölümündeki̇ bi̇lgi̇ler i̇le şablonlariniz hazir olacaktir.

”Yeni ekle” butonuna tıkladıktan sonra karşınıza yukarıdaki ekran gelecektir. Burada konu açıklamanızı belirtmeniz gerekmektedir. Yukarıda konu açıklaması kısmını müşterilerimizin isimlerini yazarak doldurduk. Örneğin Allianz yazdık ve direk oldu. Bu şekilde kategorilerinizi tanımlayabilirsiniz.
Bu işlemi yaptıktan sonra ekleme kısmını tamamlamış olacaksınız.

Grup Türüne Düzenle

Kullanabilirsiniz Grup Tipini düzenlemek için metin sütununun sağ üst köşesindeki “Düzenle” seçeneğini tıklayın. Düzenlediğiniz metin istediğiniz yönde değişecektir. Düzenleme tamamlandığında, Ana ekranın sağ üst köşesinde güncelleme başarılı ifadesini göreceksiniz. Hazır!

Grup Türüne Sil

Grup tipinizi silmek için mesaj sütununun sağ üst köşesindeki düzenle butonunun altında yer alan Sil seçeneğini kullanabilirsiniz. Silme işlemi tamamlandığında Ana ekranın sağ üst köşesinde Silme işlemi başarılı ifadesini göreceksiniz. Hazır!

Bu kadar!

Hala yardıma ihtiyacınız var mı? Bize Mesaj Gönderin

Group Type

Group Type

“Group Type” in the “Configuration” section are templates used by customers. Customer service representatives determine here how many different catagories customers will participate in, and the customer connects to the customer service representative by selecting the catagory in which he or she is located before starting the interview. Here you can create, edit, and delete customer type management. You can read the article below for more information??

By categorizing your customers here, you can organize your customers like the topics we mentioned in our previous article. Our article, which is a similar topic, can be found in Configurations > Subject section.  

Again, there may be changes depending on your company’s customer type and customer Sunday. I gave you examples on the screen you see below to be more clear. This time, I wanted to give our samples from our own company. For example, this is how we can organize our customers who reach us through this support line. Our customers point to us first, so they want to contact us on behalf of the company when. In addition, with this section, you can make edits and be more organized by creating categories for your customers. But first, I want to show you something else.

The changes or additions you make here will look exactly like this on the support line. This screen welcomes your customers. From here, you can customize this support line according to your company by making changes or additions as you wish.

Add New to Group Type

If you click the ”Add New” button, you will see this screen. If you enter subject description information in the add new section, your templates will be ready.

After clicking ”add new” button, there will be a screen above. Here you need to specify your subject description. Above, we filled in the subject description part by typing the names of our customers. For example, we wrote Allianz and it happened directly. With this way you can define your categories.
After doing this, you will have completed the adding part.

Edit To Group Type

You can use the “Edit” option in the upper-right corner of the text column to edit Group Type. The text you edit will change in the desired direction. When editing is complete, you will see the update successful statement in the upper-right corner of the Home screen. It’ s Ready!

Delete to Group Type

You can use the Delete option under the edit button in the upper-right corner of the message column to delete your group type. When the deletion is complete, you will see the Delete successful statement in the upper-right corner of the Home screen. It’s Ready!

That’s it!

Still need help? Message Us

E-posta

“Özelleştirme bölümündeki Posta”, müşterilerinizle e-posta yoluyla iletişim kurmanız içindir. İsterseniz bu seçeneği devre dışı bırakarak müşterilerinizden mail almamayı seçebilirsiniz. Daha fazla bilgi için aşağıdaki yazıyı okuyabilirsiniz. ??

e-posta yoluyla iletişim olacak mı

Bu seçeneği kullanarak kanalın mail kullanımı olup olmayacağı sorusuna cevap verebilirsiniz. Mail’i devre dışı bırakırsanız kanalınızda mail servisi devre dışı kalacak ve mail üzerinden iletişim kuramayacaksınız.

Şimdi buna nasıl izin verildiğine bakalım.

Randevu al seçeneğini açtıktan sonra değişiklikleri kaydetmeyi unutmayın!

IMAP PORTU

IMAP portu internet üzerinden e-posta göndermemizi sağlayan protokollerden biridir.

IMAP URL’SI

IMAP bağlantı noktası url adresidir.

SMTP PORTU

Giden posta sunucusu olarak da bilinen SMPT bağlantı noktası, posta göndermek için kullanılır.Smtp posta sunucusu  e-posta göndermek için üçüncü taraf yazılımları kullanabiliriz.

SMTP URT

Giden posta sunucusu olarak da bilinen SMPT’nin URL’si.

E-posta adresinizi girin

Müşterilerinizin sizinle iletişime geçebilmesi için lütfen buraya geçerli bir e-posta adresi yazın.

Posta şifrenizi girin

Lütfen müşterilerinizin sizinle iletişime geçebileceği bir e-posta için mevcut şifrenizi girin.

Mail bölümünü yapılandırmak tamamen sizin elinizde. Kişiselleştirdiğiniz Mail ekranı diğer operatörler tarafından da kullanılabilir.

Bu kadar!

Hala yardıma ihtiyacınız var mı? Bize Mesaj Gönderin

Mail

“Mail” in the “customization” section is for you to contact your customers by email. If desired, you can choose not to receive mail from your customers by disabling this option. You can read the article below for more information. ??

Will there be communication by mail

By using this option, you can answer the question of whether the channel will have mail usage. If you disable Mail, the mail service will be disabled on your channel and you will not be able to communicate via mail.

Now let’s look at how this is allowed.

Don’t forget to save the changes after you turn on get an appointment!

IMAP PORT

IMAP port is one of the protocols that allows us to send e-mail over the internet.

IMAP URL

The IMAP port is the url address.

SMTP PORT

SMPT port, also known as the outgoing mail server, is used to send mail.Smtp mail server  we can use third party software to send emails.

SMTP URT

The URL of the SMPT, also known as the outgoing mail server.

Enter your email address

Please, write a valid email address here so that your customers can contact you.

Enter your mail password

Please enter your current password for an email that your customers can contact you with.

Configuring the Mail section is completely in your hands. The Mail screen that you personalize can be used by other operators.

That’s it!

Still need help? Message Us