Category: Uncategorized

Tool

Tool

“Tool” in the “Customization” section is the general view setting used by users. Here you can change the overview settings of your support page and chat bot. The changes you make here will be seen by your customers and other opertors. your support page, where you have free personalization, will be shaped according to the settings you make. You can edit your theme color, logo, and more on this screen. You can read the article below for more information??

Tool

Choose your pre-live support page: Your pre live support page is for you to decide which page will appear when you switch to live support (Ex. index or blog)

If you choose the blog title, a page will open in this way.

Customize blog url

Here you can enter the blog url of your customer support page.

Customize blog logo url

Here you can enter the blog logo url of your customer support page.

Pre-live Support Window

Enter Your Tool Name

Here is the name of your platform where you will meet your customers. The name of this platform is also displayed by customers.

Upload Your Tool Logo

Here, you can upload your platform’s logo.

Choose a Color Theme

From here, you can set the color theme of your platform and make adjustments as you wish.

Enter Your Title

The title you will write here is determined as the name of the platform where you will meet with your customers. The name of this platform is also displayed by customers.

Enter Your Description

Here you can enter a short description for your page.

Choose the Parametres you want to recelve from your customers

You can get the information you want from your customers with the parameters you set here. At the same time, you can add ”the text of the user data protection law” to your platform from the button just below these parameters. When this button is activated, a space is created for you to put this text. You can adjust this selection in the desired direction and remove it completely if you want.

You can select a box with parameters to receive feedback from your customers. You can adjust this selection in the desired direction and remove it completely if you want. Before starting the conversation according to the paremeters you have selected, questions will appear in the chat window that opens according to your choice.

İf you turn off the option to receive paremeters, you allow them to connect to you without receiving any information from your customers.

The information you enter here will take shape just like the example shown on the right. This is what your platform will look like to your customers.

Choose the content and color of your live chat start button

Here, you can customize the content and color of your live chat start button.

Enter your footer title

You can create and edit a title for your platform’s service by entering your footer title. You can also view how your customers will see this title when you scroll down in the photo example shown on the right.

Enter footer URL

This section is for the url of your footer header that you created. please enter your existing url address here.

Upload your online icon

The icon you will upload here is an icon that will be used and displayed while online.

Upload your offline icon

The icon you will upload here is an icon that will be used and displayed while offline.

Enter the width and height of your icon

From here, you can make customizations and edits by adjusting the height and width of the icon you have uploaded.

Live Chat Window

Enter your welcome message

The message template you specify here will be a welcome message. Thus, when your customer enters your page and wants to get support, this will be the first message they will see.

Choose your team’s chat bubbles

Here you can set the text and background colors. You can also define and edit these features specifically for your chatbot, customer and team.

Choose your customers chat bubbles color

Here you can set the colors of chat bubbles. Chat bubbles are the area where messages are transmitted during a conversation. You can define and edit these features specifically for your chatbot, client and team.

Select chatbot buttons

Here you can choose the colors of Chatbot buttons.The chatbot button includes the message sending Button and the file sending button.

Redirect your customers to the pre-live chat window after ending the call?

This option is the status of the live support window in front of your customer after you have finished your search. You can turn it on or off.

Upload exit icon

Here is the icon of your chatbot seen by your client.

Notification

Notification balloons background color

Here you can decide the background color of notification balloons. The color you decide is what will appear when the chat notification falls on your screen.

Live chat queue

The message template you specify here will be shown to customers who want live support but are in line.

Live chat queue limit (Customer limit in Pool)

Here you set the limit of the live chat queue. Customers queuing for live support are adding to the pool. That means you set the limit of the customers in the pool, you can edits as you wish.

Operator connected to call

A message template is prepared here to notify the connecting operator while the customer is waiting. The message template you will prepare here will appear on the screen when the operator arrives while the customer is waiting for the operator.

Call end message

Your call has been terminated by the operator. Enter a short message here so that your customer can see this situation.

Missed Message notification

To report the status of messages that have not been received by your customers. Enter a short message so that your customer can see this situation.

Conversation recording notification

You can create a template here and use it to inform your customers that you have recorded the conversations. You can also make edits.

Customer Timeout

You can create a template here to notify your customer when they don’t respond for a long time and time out. You can also edit this template as you wish.

Rating History

Select interview evaluation topic

Determine the subject of evaluating your client’s speech (ex. good or bad).

Enter your interview review title

Before you evaluate your customer’s conversation, you can enter an introduction title here and thank your customers if you wish.

Enter your interview rating description

You can enter a description here with a template that you specify that you want your customer to evaluate your conversation.

Enter your interview rating thank you message

You can also specify a ”thank you” message to customers for conversation’s evaluation here.

Offline form

Will there be an offline message form

This question is for when operators want to reach customers when they are offline. you can report this situation with the content you enter here.

Enter your offline message description

Here’s a draft of offline messages to be shown to inform customers who arrive outside of working hours and also you can make edits.

Example Message

Hello, unfortunately, our team can’t help you because our working hours are over now. Can you fill out the form below so we can get back to you as soon as possible?

If you disable this option, your customers will not be able to see when operators are offline.

Other

Enter caller field name

Here you can determine which customers want to contact you, and you can name and edit the name of this category.

Enter category field name

Enter your customers ‘ categories here. For example, an individual customer or a corporate customer. Setting this category will provide convenience for you.

That’s it!

Still need help? Message Us

Appointment

Appointment

“Appointment” in the “Customization” section is for customers to make an appointment with their customer service representative. The appointments tab, you can customize your appointments that you create with customers and other serving operators. With personalized appointments, you will use a better quality and accessible system. You can read the article below for more information ??

Will there be an appointment: Using this option, you can answer the question of whether the channel will have an appointment status. İf you turn off the appointment option, customers will not be able to make any appointments, and all other options will disappear.

Now let’s look at how this is allowed

Don’t forget to save the changes after you turn on get an appointment!

The appointment screen you have customized is for the Handbook> Appointment page. Click here for more information and access to the article.

Options

Appointment URL

You can type the appointment url text here.

Hostname

You can view the channel you are in here.

Start Time

Appointment start time.

End Time

Appointment finish time.

Working Hours

Opening hours for appointment.

Appointment Time Zone

Current time zone tab.

After Creation Service

The appointment is an indication of a third-party service to be called upon once established.

Split Time

Indicates that for each appointment created, the calendar can be broken into minute-by-minute pieces. The calendar is divided according to the allotted minutes.

Split Label Time

Indicates the number of minutes of the meeting determined by appointment.

Wiew Mode

Wiew mode consists of two modes: busy time and free time.

Busy Time

In Bussy time mode, the serving customer representative selects times when it is not available (Ex. meeting time). The customer can choose any time other than bussy hours entered by the customer representative, and the hours set as bussy time do not fall in front of the customer.

Free Time

The serving customer representative saves their free time to the calendar. Customers make an appointment by selecting one of the Free Times included in the calendar. During the appointment process, the customer can only see and select the specified free time, not an external time.

Free Time Service:

The customer representative does not need to manually enter their free time only through the ortusdesk channel. The user company can automatically receive the customer representative’s free time with its own service.

Customizing the appointment section is entirely in your hands. The appointment screen that you personalize will be available to other operators.

That’s it!

Still need help? Message Us

How to End a Conversation?

In the Messages section, click on the conversation you want to end. Click on the “≡” icon above in the window that opens.

By clicking the “End Conversation” button at the bottom of the window that opens, you will be directed to the window to end the conversation.

To end the conversation in the window that opens, click on the Select Draft button and make the selection. After making the selection, click the “OK” button.

Still need help? Message Us

Why is Chatbot Popular?

Although chatbots have started to attract attention in recent years, they have actually been present in our digital world for a while. In 1966 the first bot, Eliza, was launched. However, Eliza could only answer a few questions. But today’s chatbots make it healthy to be able to have multiple answers and talk to customers 24/7, thanks to the development of technologies such as artificial intelligence and natural language processing.

What features do chatbots provide us with?

  • 7/24 Accessibility
  • Chatbot increases the number of positive comments.
  • Increase Your Income

    ·Get more loyal customers that will help you increase your revenue by                providing a seamless experience.

  • Chatbot Provides 30% Savings to Companies

    ·Reduce your call center costs by returning automatic answers to frequently asked questions via Chatbot.

  • Customer Convenience
  • Usage for Customer Acquisition

    ·47% of customers are open-minded about shopping with a Chatbot. (HubSpot)

  • Provides Comprehensive Customer Support

     ·Lot of persons who make shopping on the internet needs help during their shopping. Chatbots use artificial intelligence to help customers needs during shopping.

  • Take Control of Conversations

    ·Companies that invest in chatbots have full control over communication with their customers.

Still need help? Message Us

Missed Requests

All Categories > Reports > Missed Requests

Missed Requests

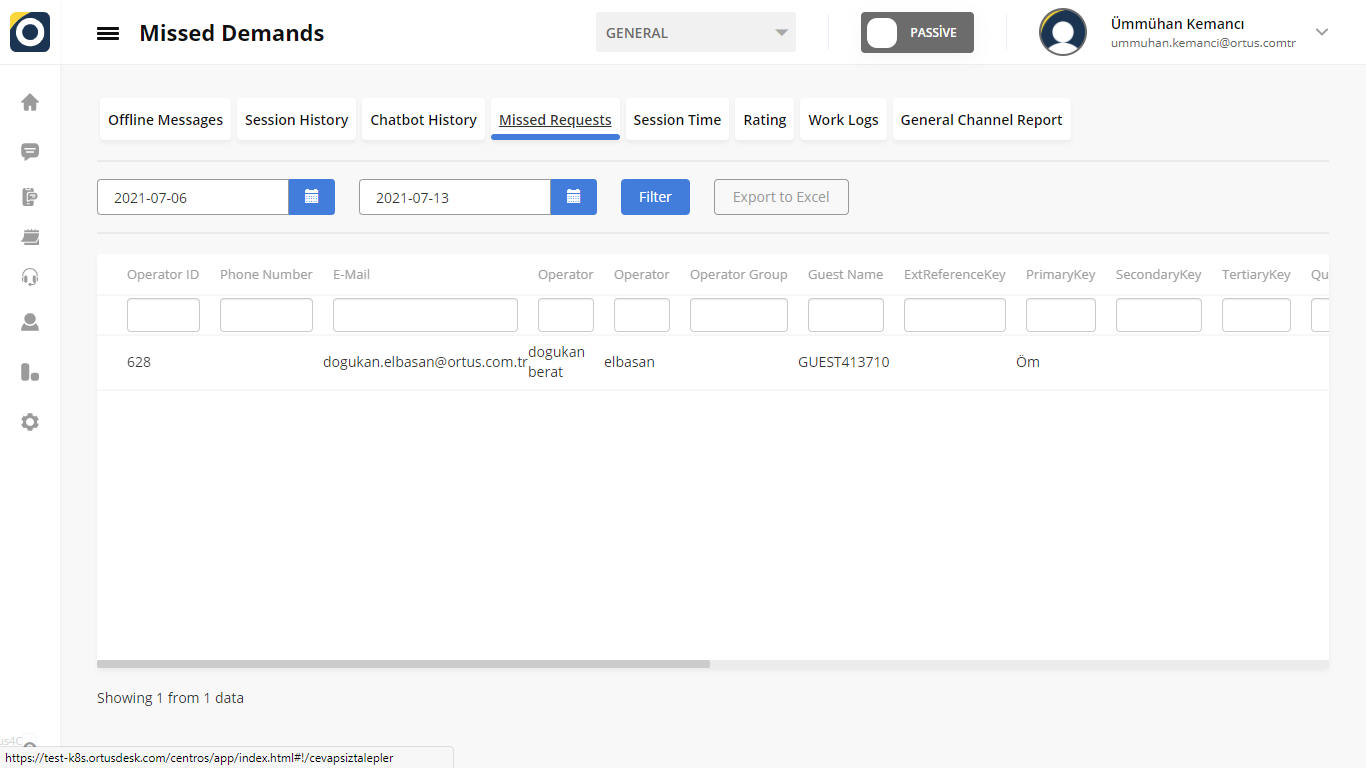
“Missed Request” ın the “Reports” section, is the section where missed calls from customers are displayed by customer service representatives. For missed calls, you can find operator ID, phone number, e-mail, operator name, operator group, guest name and others information here. When you click the Export To Excel button next to the filter button in Addattion, you can export the existing table to an excel file. You can read the article below for more information?

Operator ID

Operator ID is the ıdentıty number of the operator.

Phone Number

Phone Number is the operator’s phone number.

E-Mail

E-mail is the operator’s e-mail.

Operator

Here is the name of the operator.

Operator Group

Operator group is the group in which the operator is involved.

Guest Name

Guest nameis the name of the customer who wants to reach the operator.

Ext Referance Key, Primary Key, Secondary Key, Tertiary  Key, Quaternary Key: 

You can use these fields to get different information other than the information we have determined for the contact information of the customers. So you can make customizations as you wish.

E-Mail

E-mail is the customer’s email information. This information is automatically dropped into the system when a missed request occurs.

Phone No

Phone no is the customer’s phone information. This information is automatically dropped into the system when a missed request occurs.

IdNo

IdNo is the customer’s ID information. This information is automatically dropped into the system when a missed request

Access Channel

Access channel is a field that shows which channel the customer will connect to and talk to the operator.

Access Type

Access type indicates which type of customer is a customer (for example, corporate or individual)

Customer Type

Customer type indicates the customer’s property (ex. general or individual).

Customer Type

When the missed decommissioning is complete, you can enter a description of the specific completion type for you.

Description For Ending

You can enter a description for escaped calls.

Rating Comment

The rating comment indicates the comment the customer made for the missed request.

Rating Score

The rating score shows the score the customer gave to the missed request.

Start Date

Start date is the start time of the conversation with the client.

End Date

End date is the end time of the conversation with the customer.

As you scroll to the right, you can access a lot of information about your operators. Here you can view the channels and access types of your customers. Also the guest type is used quite often. In the guest type here, as you can see in the screenshot, your customer’s type appears. It shows whether customers are connecting from the system or from the pool when connecting to the operators. At the same time, the section next to it shows whether the negotiations have been completed or not. If the negotiations are not completed or left unfinished, customers wait for their turn in the pool. Negotiations with every customer are always completed.

The rating comments at the end of the meeting presented to your customers are also indicated here. For which operator you can view how customers make comments and also how much they score. so you can self-criticize by getting feedback from customers related to operators and have the opportunity to improve yourself even more!


At the same time, the date your operators made these calls and even the hour and minute they entered the system are always recorded in the system. As can be seen from the screenshots, the time that the operators are active in the system appears. In addition to all these, waiting times are also visible under the waiting time section.


The numbers in the lower right corner of the pages also indicate other pages. These are the continuation information of the operators. As the data is entered, the pages will increase, so it will be easy to access the old information.


That’s it!

Still need help? Message Us

YAPAY ZEKANIN ORTAYA ÇIKIŞI

Yapay zeka, günümüzün en heyecan verici teknolojik gelişmelerinden biri olarak karşımıza çıkıyor. Bilgisayarların düşünme yeteneği kazanması ve karmaşık görevleri gerçekleştirebilmesi fikri, insanlığın bilim kurgu eserlerinden gerçeğe dönüşen bir hikayesi gibi. Ancak yapay zeka alanının kökenleri oldukça eskiye dayanır ve bu yazıda, yapay zekanın nasıl doğduğunu ve geliştiğini inceleyeceğiz.

Yapay Zekanın İlk Adımları

Yapay zeka düşüncesinin temelleri, Antik Yunan filozoflarına kadar gitmektedir. Ancak modern yapay zeka, 20. yüzyılın ortalarına kadar gelişmedi. İlk bilgisayarlar, savaş zamanı hesaplamaları yapmak için kullanılıyordu ve bu bilgisayarlar, YZ’nin temelini oluşturacak mantıksal işlemleri gerçekleştirebilme kapasitesine sahipti.

Yapay Zekanın Yükselişi ve Durağan Dönem

1950’lerden 1970’lere kadar olan dönem, yapay zeka alanının hızla geliştiği bir dönemdi. Bu dönemde, şimdi temel kabul edilen birçok yapay zeka konsepti ortaya çıktı. Ancak, 1980’lerde beklenen başarılar elde edilemedi ve bu dönem “Yapay Zeka Kışı” olarak adlandırıldı.

Derin Öğrenme ve Büyük Veri Devrimi

2000’lerin başından itibaren, yapay zeka alanı derin öğrenme gibi yeni tekniklerle canlandı. Büyük veri ve gelişmiş hesaplama kaynakları, yapay zeka sistemlerini daha karmaşık görevleri başarabilecek düzeye taşıdı.

Yapay Zeka Bugün ve Gelecekteki Potansiyeli

Yapay zeka, şu anda birçok alanda kullanılıyor; otomasyon, sağlık, ulaşım, eğitim ve daha birçok alanda büyük bir etki yaratıyor. Yapay zeka, gelecekte de daha da gelişeceğe benziyor ve hayatımızın birçok yönünü değiştirecek potansiyele sahip.

What is TeleHealth?

Ortus4C is an artificial intelligence-based telehealth product that can digitize clinics and enable online examinations by establishing video and audio communication between doctors of medicine.

Need for Operation / Problem

· The need to provide remote health services and produce solutions, especially during the pandemic process.

· Increasing density and hygiene concerns in hospitals

· Patient requests who do not want to go to the hospital or examination again to get a second doctor’s opinion.

Operation Effect

· Safe and hygienic inspection
· Reaching a patient/customer audience that is normally hard to reach

· Increased patient/customer satisfaction with the convenience provided.
· 40 workforce and 60% cost advantage.

Smart Diagnosis

The entry of artificial intelligence into healthcare is helping doctors diagnose patients with much greater accuracy and efficiency

E-Prescription

For prescribers and their patients, it offer the option to use e-prescription as alternative of paper prescription.

Medical Reminders

Take your daily medications on time and never miss a dose with your reminders.

rRPG

During the video call, it detects the color change in the capillaries and performs the heart rate measurement.

IoT Device Integration

Enables monitoring of health data collected from smartwatches and devices.